Doors & Windows Installation Procedure
Quality installation of premium quality, aluminium, PVC (vinyl) and wood windows and doors.
DOORS & WINDOWS INSTALLATION PROCEDURE
1. During the doors and windows installation there is one of two options available or their combination:
- direct fixing by means of the shifted tighting elements by the opening frames (dowelbars) mounted to the wall,
- indirect fixing to the frame by means of the tighting indirect elements (anchor) mounted to the wall.
2. Bigger constructions, entrance doors, sliding doors, bi-fold doors, arches must be mounted by means of dowel bars. It is important to remember about the installation gap:
- for aluminium windows - width 30 mm and 50 mm height,
- for aluminium doors - 30 mm width and 15 mm height (uppergap) if doors are placed directly on the floor.
- the threshold of every sliding construction must be supported all along its length.
- threshold of every patio doors construction (slide, lift & slide, tilt & slide, bi-fold) must be supported all along its length. During the patio doors installation sub threshold expands should always be used. Expands should be dunked in flooring.
ATTENTION! In case any visible damage of construction or its fault the door should be not mounted and the fault should be reported to seller or manufacturer to remove. The door installation is consistent with the receipt of the visual part of the door and lack of damages during the transport.
3. Stages of the ALUMINIUM joinery installation:
Description of aluminum doors installation:The choice of front and balcony doors installation method depends mainly on the situation at the construction site. The required method of door threshold installation is the direct placing of the construction on a finished floor. If there is no possibility of placing the door threshold on a finished floor, the threshold needs to be deinstalled after the door is placed and installed again after the floor is finished. The threshold needs to be permanently connected to the ground in a mechanical manner using dowels.
- place the complete door in the door light-passage /opening with the loose/ right, opening to outside/ opening to inside with the equal distance between the frame and wall.
- stabilize the door in the opening by means of the distance shims (between the wall and frame). In order to stabilize place the construction on pads placed in bottom part of frame and set the distance shims between frame and lintel.
- Using the distance shims precisely set the verticals of frame and level up top beam and threshold (the fixed support must be kept - fig. 1).
- fix the frame to the wall elements using the dowels designed to the type of floor and available to use. Mounting must be made in proper places i.e. near the hinges (top, middle, bottom) - fig.2. In the same way the frame on the side of hitches should be mounted. The top frame and threshold must be fixed.
- check the installation once again by the sash adherence. Regulate the sash position to the frame by using the frame.
- make the necessary finishing on the joint of sash and frame before the montage foam application. That must be done along both sides of a frame taking into account the warning of the materials producers (to dampen the wall surface by means of foam). Seals and frame must be protected against the dirt or damage before filling. The frame can be veneered by the painting tape, proper to the joinery protection. It must be taken off directly after the montage.
- check the efficiency of the installation, regulate sash, hinges and locks and if needed make a regulation once again.
- indirect fixing to the frame by means of the tighting indirect elements (anchor) mounted to the wall.
Description of aluminum windows installation:
- Remove the sash of the window frame.
- Set the window frame while maintaining equal spacing between the frame and the wall (installation, point 2).
- Stabilize the window frame with shim spacers and wedges.
- Set exactly the vertical and horizontal alignment with the help of shim wedges.
- Attach the frame to the wall element with bolts or anchors (installation, point 1).
- It is recommended to make these fastenings in the designated areas (Fig. 2).
- Install the sash to the frame while checking the functioning of the installed window; make additional adjustments, if necessary.
- Necessary finishing should be performed at the point of the frame and wall contact by injecting the installation foam.
Method of balcony doors and entrance doors installation depends mainly on the situation at the construction site. Required method of installation for balcony doors and entrance doors is installation with the use of insulating profiles (made of aluminium). Set the insulating profiles on spacers, connect them to the base using anchors (do not remove spacers). Both for entrance doors and balcony doors, particularly patio doors, the threshold shall be carefully levelled. Example scheme of installation the low- profile threshold with the use subthreshold profiles 77 series is presented below.
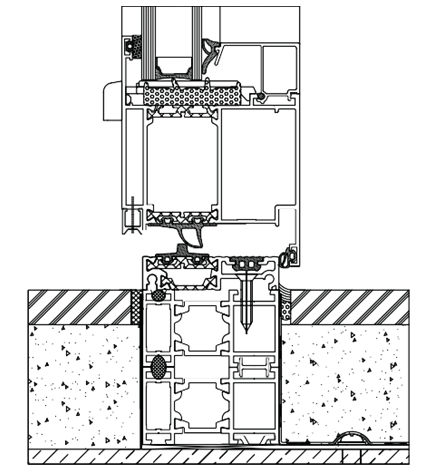
Scheme of low threshold installation
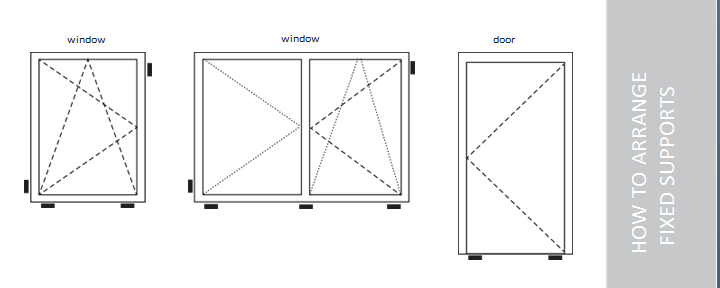
Fig. 1 How to arrange fixed supports
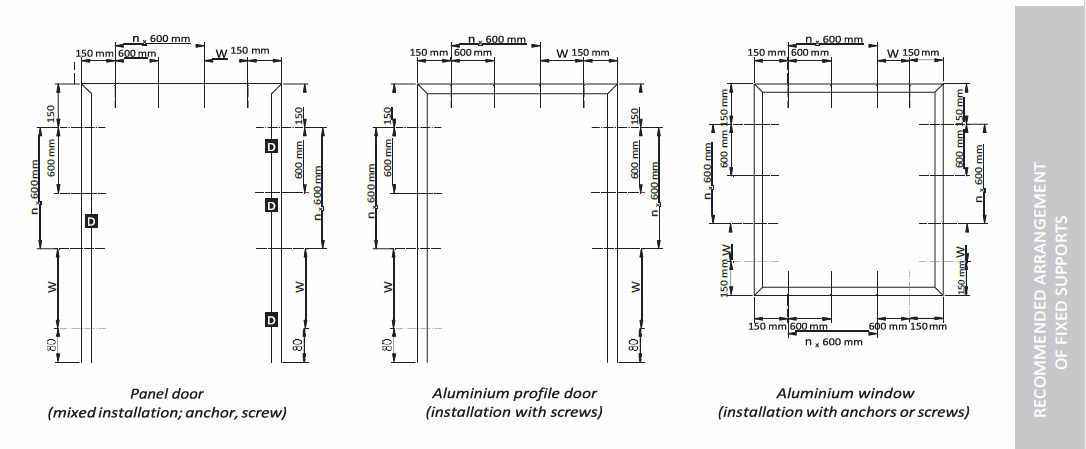
Fig. 2 Recommended distance between fixing elements (screw, anchor)
n - multiple; W - target dimension;
D - anchor bolt placed by hinges and lock
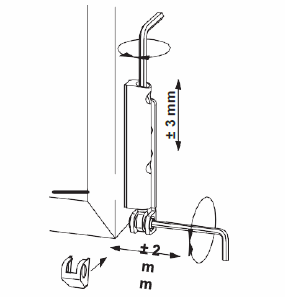
Fig. 3a Bottom hinge
Sash height adjustment +/- 3 mm
Sash lateral adjustment +/- 2 mm.
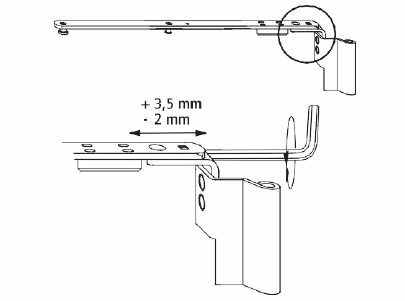
Fig. 3b Distractor
Lateral adjustment on distractor (-2 mm in the backward direction of hinge, +3,5 mm in the direction of hinge).

Fig. 3e Frame part of element DFE/TFE.
Sash height adjustment (+ 3 mm) via DFE/TFE adapter
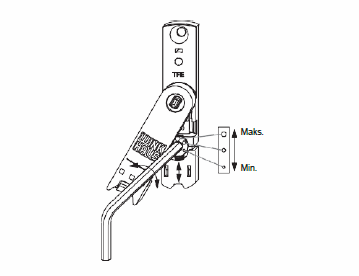
Fig 3f Sash tightening force by latch.
Tightening force adjustment by appropriate setting of the eccentric.
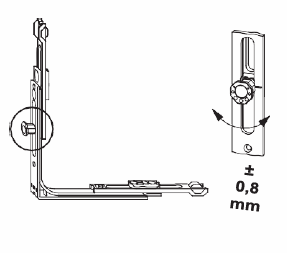
Fig. 3g Octagonal locking pain
Sash pressure adjustment to the frame by turning the octagonal locking pin (+/- 0.8 mm).
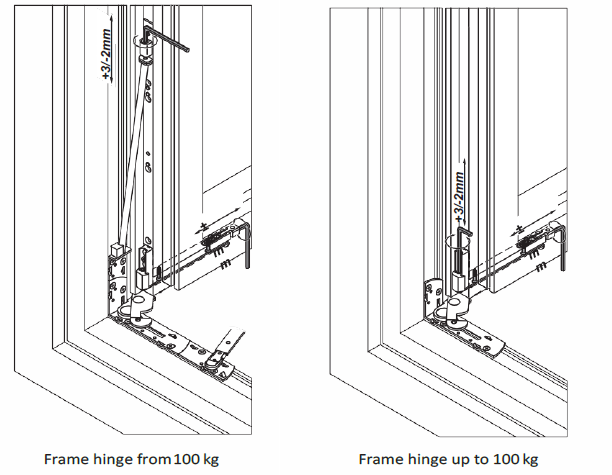
Fig. 3c Bottom hinge
Sash height adjustment (+ 3 mm/- 2 mm). Sash lateral adjustment (+/-2 mm)
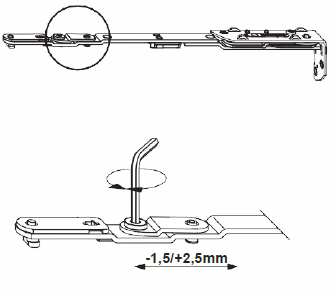
Fig. 3d Distractor
Sash lateral adjustment on distractor (+2,5 mm/-1,5 mm)
Adjustment of door surface hinges
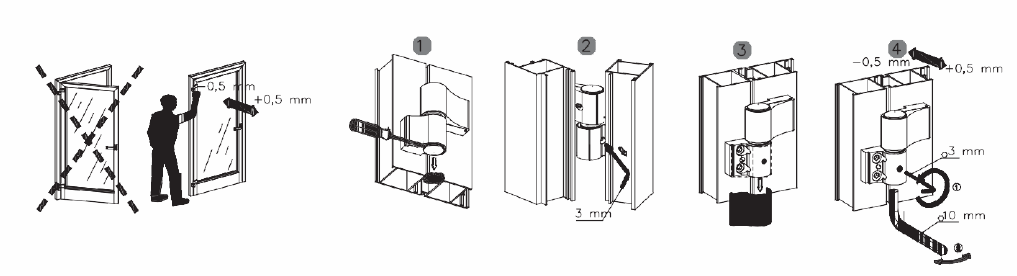
Fig. 4 Gasket clamp regulation
- Remove the plug (for example by prying it with the screwdriver)
- When doors are opened, put the screw using 3mm allen wrench
- Slide the hinge cover to gain access to regulation
- Veer the screw by 3 mm allen key
Wanted regulation of the gasket clamp can be obtained by turning the 10 mm allen wrench in the proper direction.
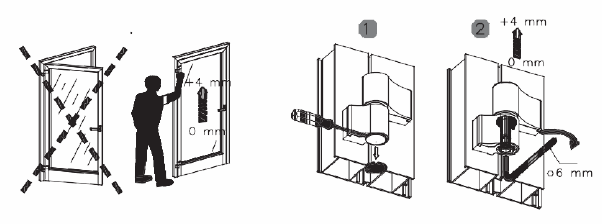
Fig. 5 Vertical regulation
- Remove the plug (for example by prying it with the screwdriver)
- Wanted regulation of the gasket clamp can be obtained by turning the 6 mm allen wrench in the proper direction
ALUMINIUM PRODUCTS GUARANTEE CARD

Fig. 6 Regulation of the leaf-frame gap width
- Remove the plug (for example by prying it with the screwdriver)
- When doors are opened, put the screw using 3mm allen wrench
- Slide the hinge cover to gain access to regulation
- Veer the screw by 4 mm allen key
Wanted regulation of the gasket clamp can be obtained by turning the 6 mm allen wrench in the proper direction.
Regulation of roller door hinges
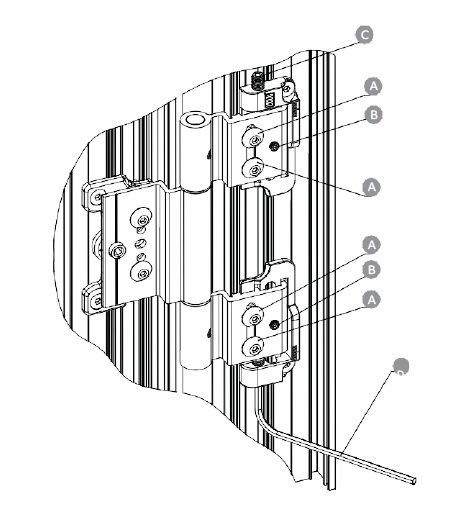
Fig. 7 The regulation of height (+/- 5mm)
- Door before regulation should be D relieved
- Loosen fastening screws A and screws B
- Unscrew the clamp C
- Regulate with spindle D
- Once the adjustment is finished, tighten the screws A as well as the clamp screws B and C
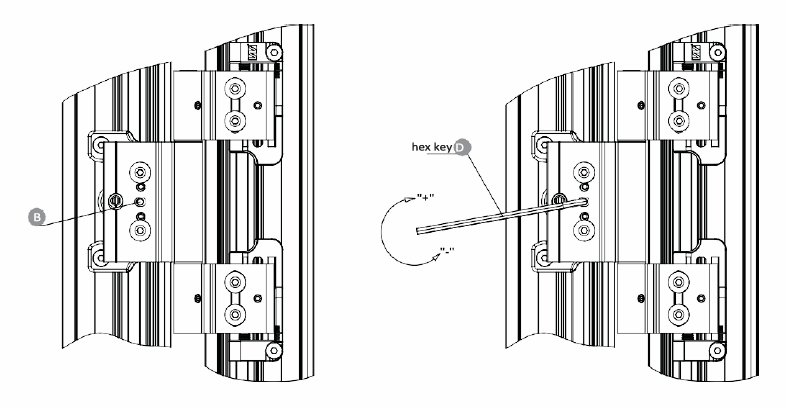
Fig. 8 The regulation of slit (variable +/- 2,5 mm)
- Regulate by screw clamp (one turn of key B changes slit of 1,25 mm)
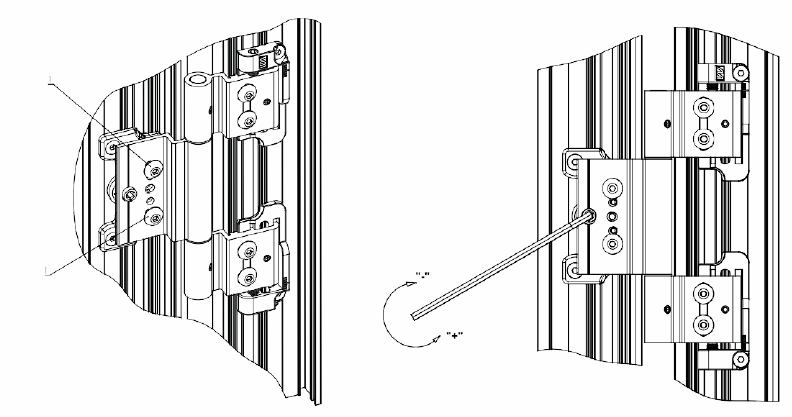
Fig. 9 The regulation of seal clamp (variable +/- 0,5 mm)
- The door before regulation should be released
- Loosen the screws A and the bits
- Regulate the seal clamp with imbues 5. Maximum regulation is achieved after ¼ turn
- Screw A back after the regulation
Regulation of self-closer
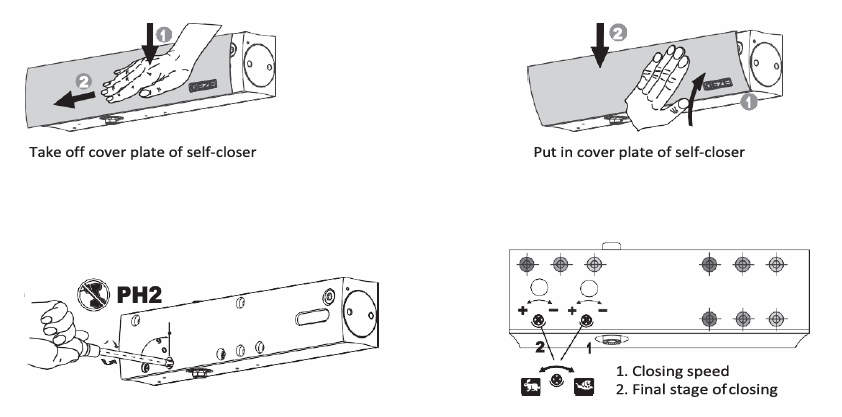
Fig. 10. Adjustment of self-closer
Regulation of door locks
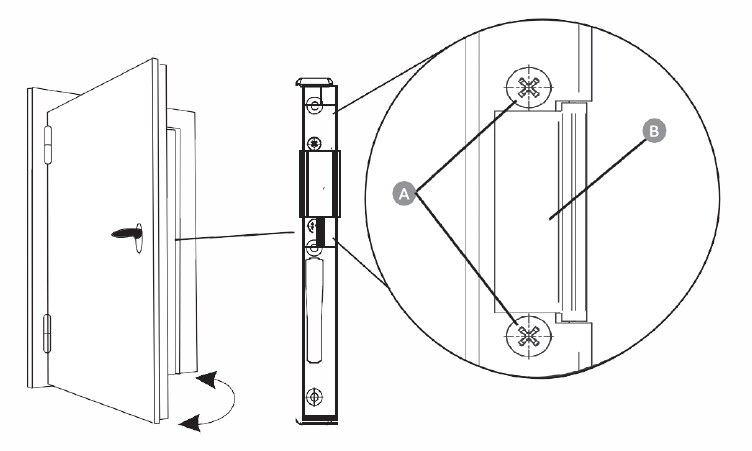
Fig. 11. Adjustment of door lock catches
- A Loosen the screws of about 1-1.5 turn.
- B Set the adjusting plate 2 in the desired position (adjustment range ± 1.5 mm).
- A Tighten the screws.
Note: If necessary, loosen the screws that secure the striker to the frame
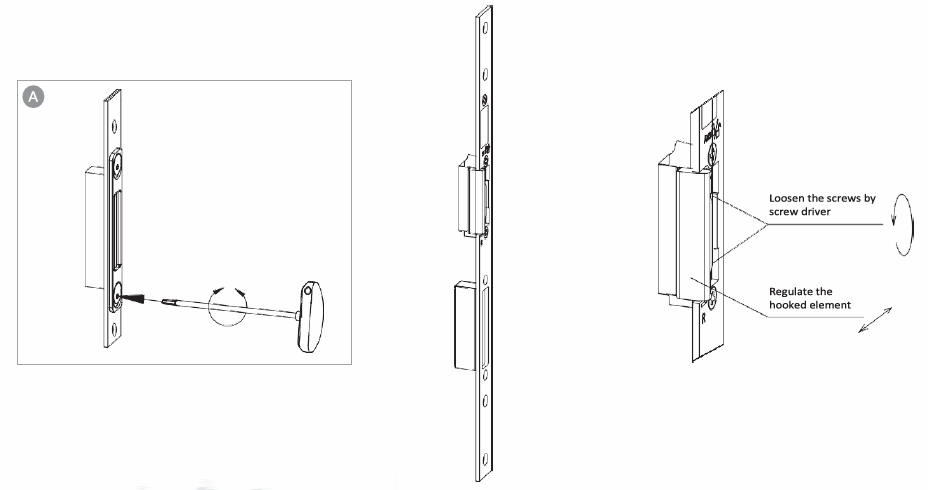
Fig. 12. Regulation of lock door hooks
- A Regulation of sash and frame clamp +/- 2 mm
Attention: If necessary, loosen the screws in frame
Discover your better home!
Please call us to book a private consultation or visit us in our showroom located in Oakville Ontario.